Monday, October 20, 2014

Productivity Tips for Visual Studio 2013

  No comments
By following these tips, you can more quickly and efficiently write, navigate, and debug your code in Visual Studio. For more information about common keyboard shortcuts, seeTips and Tricks for Visual Studio. For a more complete list, see Pre-defined Keyboard Shortcuts.
This topic includes the following sections:

Accessing Visual Studio Tools

You can more easily access the Developer Command Prompt or another tool if you pin it to the Start screen or the taskbar.
  1. From the Start screen, enter Visual Studio Tools, and then choose the Enter key.
  2. In File Explorer, open the shortcut menu for the item that you want:
    • Build Notifications
    • Debuggable Package Manager
    • Developer Command Prompt for VS2013
    • Microsoft Feedback Client 2013
    • VS2013 ARM Cross Tools Command Prompt
    • VS2013 x64 Cross Tools Command Prompt
    • VS2013 x64 Native Tools Command Prompt
    • VS2013 x86 Native Tools Command Prompt
  3. Choose Pin to Start or Pin to Taskbar.

Writing Code

Write code more quickly by using the following features.
  • Use sample applications. You can speed up application development by downloading and installing sample applications from the MSDN Code Gallery. You can also learn a particular technology or programming concept by downloading and exploring a Sample Pack for that area.
  • Use IntelliSense. As you enter code in the editor, IntelliSense information, such as List Members, Parameter Info, Quick Info, Signature Help, and Complete Word, appears. These features support fuzzy matching of text; for example, the results lists for List Members includes not only entries that start with the characters that you have entered but also entries that contain the character combination anywhere in their names. For more information, see Using IntelliSense.
  • Change auto-insertion of IntelliSense options as you enter code. By switching IntelliSense to suggestion mode, you can specify that IntelliSense options are inserted only if you explicitly choose them.
    To enable suggestion mode, choose the Ctrl + Alt + Spacebar keys, or, on the menu bar, choose EditIntelliSenseToggle Completion Mode.
  • Use code snippets. You can use built-in snippets or create your own snippets.
    To insert a snippet, on the menu bar, choose EditIntelliSenseInsert Snippet or open the shortcut menu in a file and choose Insert Snippet. For more information, seeCode Snippets.
  • Fix code errors inline. Smart Tags appear as blue or red boxes under a line of code. You can display Smart Tag options by pointing to one of the boxes or by placing the cursor in the line of code and choosing the Ctrl + . (period) keys.
    Blue boxes suggest ways to fix errors in your code.
    Figure 1: Error Smart Tags
    Error Smart Tag Suggestions
    Red boxes suggest ways to refactor your code.
    Figure 2: Refactoring Smart Tags
    Refactor Smart Tag Suggestions
  • Show and edit the definition of a code element. You can quickly show and edit the module in which a code element, such as a member, a variable, or a local, is defined.
    To open a definition in a pop-up window, highlight the element and then choose the Alt+F12 keys, or open the shortcut menu for the element and then choose Peek Definition. To open a definition in a separate code window, open the shortcut menu for the element, and then choose Go to Definition.

Navigating Within Your Code

You can use various techniques to find and move to specific locations in your code more quickly.
  • Bookmark lines of code. You can use bookmarks to navigate quickly to specific lines of code in a file.
    To set a bookmark, on the menu bar, choose EditBookmarksToggle Bookmark. You can view all of the bookmarks for a solution in the Bookmarks window. For more information, see Setting Bookmarks in Code.
  • Search for symbol definitions in a file. You can search within a solution to locate symbol definitions and file names, but search results don’t include namespaces or local variables.
    To access this feature, on the menu bar, choose EditNavigate To.
  • Browse the overall structure of your code. In Solution Explorer, you can search and browse classes and their types and members in your projects. You can also search for symbols, view a method’s Call Hierarchy, find symbol references, and perform other tasks. If you choose a code element in Solution Explorer, the associated file opens in a Preview tab, and the cursor moves to the element in the file. For more information, see Viewing the Structure of Code.

Finding Items Faster

You can search across the IDE for commands, files, and options, in addition to filtering the contents of tool windows to show only relevant information for your current task.
  • Filter the contents of tool windows. You can search within the contents of many tool windows, such as the Toolbox, the Properties window, and Solution Explorer, but display only items whose names contain the characters that you specify.
  • Display only the errors you want to address. If you choose the Filter button on the Error List toolbar, you can reduce the number of errors that appear in the Error List window. You can display only the errors in the files that are open in the editor, only the errors in the current file, or only the errors in the current project. You can also search within the Error List window to find specific errors.
  • Find dialog boxes, menu commands, and options. In the Quick Launch box, enter keywords or phrases for the items that you’re trying to find. For example, the following options appear if you enter new project:
    Figure 3: Quick Launch results list for new project
    Quick Launch Results for 'new project'
    Quick Launch displays links to the New Project dialog box, the Add New Item dialog box, and the Projects and Solutions page in the Options dialog box, among others. Quick Launch results can also include project files and tool windows.

Debugging Code

Debugging can consume a lot of time, but the following tips can help you speed up the process.
  • Test the same page, application, or site in different browsers. As you debug your code, you can easily switch among the installed web browsers, including Page Inspector (Visual Studio), without having to open the Browse With dialog box. You can use the Debug Target list, which is on the Standard toolbar next to the Start Debugging button, to quickly verify which browser you’re using as you debug or view pages.
    Select Web browser debug options
  • Set temporary breakpoints. You can create a temporary breakpoint in the current line of code and start the debugger simultaneously. When you hit that line of code, the debugger enters break mode. For more information, see Start, Break, Step, Run through Code, and Stop Debugging in Visual Studio.
    To use this feature, choose the Ctrl + F10 keys, or open the shortcut menu for the line of code on which you want to break, and then choose Run To Cursor.
  • Move the execution point during debugging. You can move the current execution point to a different section of code and then restart debugging from that point. This technique is useful if you want to debug a section of code without having to recreate all of the steps that are required to reach that section. For more information, see Start, Break, Step, Run through Code, and Stop Debugging in Visual Studio.
    To move the execution point, drag the yellow arrowhead to a location where you want to set the next statement in the same source file, and then choose the F5 key to continue debugging.
  • Capture value information for variables. You can add a DataTip to a variable in your code and pin it so that you can access the last known value for the variable after debugging has finished. For more information, see View data values in Data Tips in the code editor.
    To add a DataTip, the debugger must be in break mode. Place the cursor on the variable, and then choose the pin button on the DataTip that appears. When debugging is stopped, a blue pin icon appears in the source file next to the line of code that contains the variable. If you point to the blue pin, the value of the variable from the most recent debugging session appears.
  • Clear the Immediate window. You can erase the contents of the Immediate Window at design time by entering >cls or >Edit.ClearAll
    For more information about additional commands, see Visual Studio Command Aliases.

Managing Files, Toolbars, and Windows

At any one time, you may be working in multiple code files and moving among several tool windows as you develop an application. You can keep organized by using the following tips.
  • Keep files that you frequently use visible in the editor. You can pin files to the left side of the tab well so that they remain visible regardless of how many files are open in the editor.
    To pin a file, choose the file’s tab, and then choose the Toggle Pin Status button.
  • Move documents and windows to other monitors. If you use more than one monitor when you develop applications, you can work on portions of your application more easily by moving files that are open in the editor to another monitor. You can also move tool windows, such as debugger windows, to another monitor and tab dock document and tool windows together to create “rafts.” For more information, see How to: Arrange and Dock Windows.
    You can also manage files more easily by creating another instance of Solution Explorer and moving it to another monitor. To create another instance of Solution Explorer, open a shortcut menu in Solution Explorer, and then choose New Solution Explorer View.
  • Customize the fonts that appear in Visual Studio. You can change the font face, size, and color that’s used for text in the IDE. For example, you can customize the color of specific code elements in the editor and the font face in tool windows or throughout the IDE. For more information, see How to: Change Visual Studio Fonts and Colors and How to: Change Fonts and Colors in the Editor.
Source : http://msdn.microsoft.com/en-us/library/jj153218.aspx

Saturday, October 11, 2014

Step-By-Step: Enabling Hyper-V for use on Windows 8.1

  No comments
Virtual Machines are great for running different operating systems or software configurations on a single machine and many other additional tasks. The launch of the Windows 8 offering was the first Windows client operating system to include hardware virtualization support without the need for separate installs or downloads. The Hyper-V client found in Windows 8 is the same technology used in Windows Server 2012 Hyper-V allowing IT professionals to move VMs from server to client without the requirement to re-learn the use of Hyper-V features and tools.

In Windows 8.1 further enhancements to the Client Hyper-V were introduced. The most notable update called Enhanced Session Mode enables high fidelity graphics for connections to VM's using the RDP protocol.  In addition USB redirection is also enabled from the host to VM's.


Step 1: Prerequisites
The following prerequisites are required to successfully run Client Hyper-V on Windows 8.1:
Step 2: Setting Up Hyper-V
  1. Ensure that hardware virtualization support is turned on in the BIOS settings.


  2. Save the BIOS settings and boot up the machine normally,
     
  3. At the Start Screen, swipe the right hand side of the screen and select the Search Charm.
     
  4. Type turn windows features on or off and select that item
     
  5. Select and enable Hyper-V


  6. If Hyper-V was not previously enabled, reboot the machine to apply the change.

    NOTE: As a best practice, it’s a good idea to configure networking for the Hyper-V environment to support external network connections. Ensure that a virtual switch has been created and is functional.
     
  7. Open the Virtual Switch Manager, found on the Actions panel in the Hyper-V Manager, by typing Hyper-V at the Start Screen.


  8. Select “Virtual Switch Manager” in the Actions pane.
     
  9. Ensure that “External” is highlighted, and then click on the “Create Virtual Switch” button.


  10. If more than one NIC in is present, ensure that the proper NIC is selected for use on the VM external network connections.


     NOTE: There are a great deal of other options and features that can be configure.  This Step-By-Step provides a good starting point and is all that is needed to start creating and using VMs on Window 8 Pro.

Sunday, October 5, 2014

Add "Lock Drive" to Unlocked BitLocker Drives Context Menu in Windows 7 and Windows 8

  No comments
Information
To lock an unlocked fixed data drive (ex: internal hard drive) encrypted by BitLocker, you would normally restart the computer.

To lock an unlocked removable data drive (ex: USB drive) encrypted by BitLocker, you would normally disconnect it or restart the computer.

In Windows 8, if you have auto-unlock turned on for a data drive, then it will automatically be unlocked when connected (removable data drive) or you sign in to Windows 8 (fixed data drive).


This tutorial will show you how to add "Lock Drive" to the context menu of all unlocked fixed and removable data drives encrypted by BitLocker to be able to lock the drive in Windows 7 andWindows 8 without having to restart the computer for fixed data drives, disconnect removable data drives, and still be able to leave auto-unlock turned on for any data drives.
Note   Note
You must be signed in as an administrator to be able to do the steps in the tutorial, and to be able to use the "Lock Drive" context menu item.

"Lock Drive" is purposely not added to the context menu of the C: OS drive since it contains the current running operating system, and cannot be locked while Windows 8 is running.
warning   Warning
In Windows 7, BitLocker Drive Encryption is only available in the Windows 7 Ultimate and Windows 7 Enterprise editions.

In Windows 8, BitLocker Drive Encryption is only available in the Windows 8 Pro and Windows 8 Enterprise editions.

EXAMPLE: "Lock Drive" in Context Menu

Click image for larger version

 OPTION ONE 
To Add "Lock Drive" to Context Menu of Unlocked BitLocker Drives

1. Click/tap on the Download button below to download the .ZIP file below.

Add_Lock_Drive_to_Context_Menu.zip


download

2. Save the .ZIP file to your desktop, and open it.

3. Extract (drag and drop) the contents (.vbs and .reg files) from inside the ZIP file to your desktop.

4. Unblock the extracted lock-bde.vbs file.

5. In File Explorer (Windows 8) or Windows Explorer (Windows 7), navigate to C:\Windows\System32, and copy/movethe lock-bde.vbs file into the System32 folder.

6. If prompted, click/tap on Continue and Yes to approve.

7. Double click/tap on the extracted .reg file to merge it.

8. If prompted, click/tap on RunYes (UAC), Yes, and OK.


Note   Note
When you lock a drive encrypted by BitLocker, you will be prompted by UAC to click/tap on "Yes" to approve first. After a moment, the drive will be locked.

If the drive has been turned off due to being idle, then it will take a few more seconds to be locked while it waits for the HDD to spin back up.


 OPTION TWO 
Remove "Lock Drive" from Context Menu of Unlocked BitLocker Drives

NOTE: This is the default setting.

1. Click/tap on the Download button below to download the .reg file below.

Remove_Lock_Drive_from_Context_Menu.reg

download

2. Save the .reg file to your desktop.

3. Double click/tap on the .reg file to merge it.

4. If prompted, click/tap on RunYes (UAC), Yes, and OK.

5. In File Explorer (Windows 8) or Windows Explorer (Windows 7), navigate to C:\Windows\System32, and delete thelock-bde.vbs file.

6. If prompted, click/tap on Yes (UAC) to approve deleting the lock-bde.vbs file.

Source Copied From : http://www.eightforums.com/

Wednesday, October 1, 2014

Add All Your Facebook Friends in a Group in One Click

  No comments
So in this post I will be sharing the code to add all your Facebook Friends to any group either it may be your's or it may not be. This code will simply add everyone without even their permission. On one hand it may be irritating for others but on the other hand (that's yours) it will be quite helpful.
There are many extensions of Chrome which offer the same, but we would not recommend those as most of them not just add friends to a group but also tries to spam your profile in one way or the other.

Note: Use Google Chrome Browser for it.

Follow the steps to Add All Friends to Any Facebook Group:
  • Open the Facebook group where you want to add all your Facebook Friends. Note down the number of members in the group. 
  • Press [F12] Button to open up Developers Window.
  • Select Console Window. 
  • Copy the Code from HERE and paste it in console window. Press Enter and wait for 10-20 Seconds. (If your friend list is long then it might take some 2-3 minutes) 
  • Now All your Friends will be added to the Group. You may confirm it by noting down the total members of the group.

Don't misuse this code to spam others, Use it wisely. Share this trick with your friends and leave a comment below if you need any further help.

Tuesday, September 9, 2014

Facebook 5000 Friends Limit

  No comments
If you happen to be a celebrity, a politician or public figure, you will find yourself reaching facebook’s friends limit in no time and when this happens, you can neither send nor receive friends request. Unlike twitter where thousands can follow you and google+ where you can be added to a countless number of circles, the limit facebook places on friendship looks rather ridiculous. But wait a minute, is it really possible to have 5,000 real friends?

To be candid, most of these people you call friends are actually fans and it’s for this reason the idea of fan pages was brought to life. Facebook pages allow you to connect with millions of people without any limit but taking a critical look at the whole thing, you might want to agree with me that the limit facebook places on the number of friends you have has a number of advantages. Knowing you would reach the limit soon, you should be mindful of people you send friends request to and those you approve. This also reduces spam to some extent. Lots of people might see you as a snub but you don’t need to approve every request. Have you even noticed most of those 5,000 friends you have don’t even talk to you? Purging your friends list can be a good idea but if you can’t do this, there’s only a way out to pass the five thousand friends limit.

How Do I Add More than 5,000 Friends on Facebook?

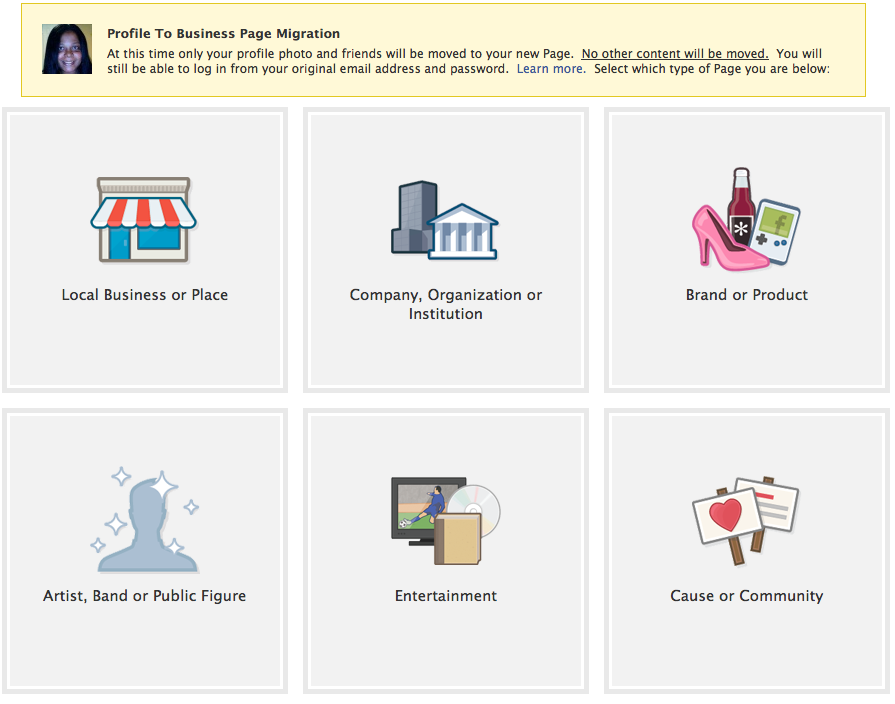
Do you want to hear the truth and nothing else but the truth? You can’t possible have more than 5,000 friends unless you convert your personal profile to a fan page.This is the only way to exceed the limit but you should understand that those you’ve added as friends before are automatically changed to fans who have liked your page.

The socializing aspect of facebook may be gone after migrating as your news feed is replaced by posts from pages you like and you can no longer comment on your friends’ status updated and photos. It sucks, huh?

Well, that’s the only way out and your social life on facebook may become so boring after doing this. However, you can still receive messages but you won’t be able to use facebook chat any longer and there are lots of things you’re going to miss so you have to be sure you know exactly what you’re doing.

To convert your personal profile to a fan page, click here.


You should download your personal data containing your photos, comments among other things because according to facebook, only your profile photo and friends will be moved to your new Page. No other content will be moved. You will still be able to log in from your original email address and password.


If you still go ahead to convert your profile page to a fan page, you can create a new profile for connecting with just a selected number of friends and family. You should then set the new profile as that fan page administrator to make it easier.

Saturday, September 6, 2014

Wednesday, April 16, 2014

Nepal Loadshedding Schedule For Desktop

  No comments
Nepal Loadshedding Schedule
Version 2.0

Introduction:
Nepal Loadshedding Schedule Is A Desktop Application To Let The Pc/Laptops Users Be Aware Of Their Loadshedding Schedule In Their Own Desktop.

Features:
  • Portable to Fit in the Desktop Corner.
  • Medium and Small Sized Widgets.
  • User Friendly Designs and UIs.
  • Auto Update Schedule when ever available.
  • Schedule in Both English and Nepali.
  • Widgets with Nepali Date and Loadshedding Info.
  • Auto Shutdown PC as per User's Wish.
    and Many More..................
Desktop Widget


DOWNLOADS:

Developed By:
Saroj Poudel 

For Any Bugs, Queries And Problems Related To Software Please Write Me In The Mentioned Email Address

Wednesday, February 19, 2014